I have performed an investigation on how Sitecore adds the values to the route. As of now, I've found 2 ways of adding custom data to the route node:
Extend the GetJsLayoutRenderer and override the RenderItem
Change the serialization transformer.
For your case, the quickest way is to use the second option. The first one will require more customization on the model being used etc. So, for the second option, you need to override the current implementation of the LayoutTransformer found at the namespace Sitecore.JavaScriptServices.ViewEngine.LayoutService.Serialization.LayoutTransformer in the assembly Sitecore.JavaScriptServices.ViewEngine.
The implementation is as follows:
using System.Dynamic;
using Sitecore.Configuration;
using Sitecore.Data;
using Sitecore.JavaScriptServices.ViewEngine.LayoutService.Serialization;
using Sitecore.LayoutService.ItemRendering;

public class CustomLayoutTransformer : LayoutTransformer
{
    public CustomLayoutTransformer(IPlaceholderTransformer placeholderTransformer) : base(placeholderTransformer)
    {
    }

    public override dynamic Transform(RenderedItem rendered)
    {
        var route = ((rendered.Name == null) ? null : new
        {
            name = rendered.Name,
            displayName = rendered.DisplayName,
            fields = rendered.Fields,
            databaseName = rendered.DatabaseName,
            deviceId = rendered.DeviceId,
            itemId = rendered.ItemId,
            itemLanguage = rendered.ItemLanguage,
            itemVersion = rendered.ItemVersion,
            layoutId = rendered.LayoutId,
            layoutName = Factory.GetDatabase("master").GetItem(new ID(rendered.LayoutId))?.Name,
            templateId = rendered.TemplateId,
            templateName = rendered.TemplateName,
            placeholders = PlaceholderTransformer.TransformPlaceholders(rendered.Placeholders)
        });

        dynamic val = new ExpandoObject();

        val.sitecore = new
        {
            context = rendered.Context,
            route = route
        };
        return val;
    }
}
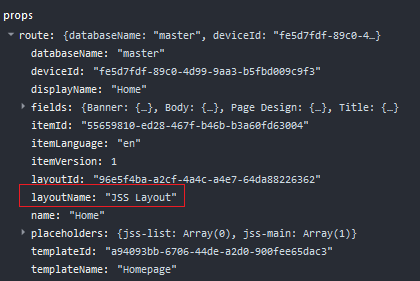
You will notice that I have added a property in the route model named layoutName and then I've used the rendered.LayoutId to retrieve the layout item name.
Once you have the code above implemented, you need to patch the current LayoutTransformer with the new one. An example of the patch config is provided below
<configuration xmlns:patch="http://www.sitecore.net/xmlconfig/">
  <sitecore>
    <layoutService>
      <configurations>
        <config name="jss">
          <serialization type="Sitecore.JavaScriptServices.ViewEngine.LayoutService.SerializationConfiguration, Sitecore.JavaScriptServices.ViewEngine">
            <transformer type="Sitecore.Module.Checklist.Pipelines.CustomLayoutTransformer, Sitecore.Module.Checklist" patch:instead="transformer[@type='Sitecore.JavaScriptServices.ViewEngine.LayoutService.Serialization.LayoutTransformer, Sitecore.JavaScriptServices.ViewEngine']" resolve="true" />
          </serialization>
        </config>
      </configurations>
    </layoutService>
  </sitecore>
</configuration>
Below is a screenshot of the result

Now, I will investigate a bit more on how to perform the first implementation and document it. I will share the link here once done.
