35

I have a Sitecore 8.1 instance and we are using Solr 4.10 for search. I followed the Solr installation guide found here - https://sitecore-community.github.io/docs/search/solr/fast-track-solr-for-lazy-developers/. The instructions there show you how to start the Solr instance manually. However, I was wondering how to set up Solr as a Windows service so that it runs automatically.

Thanks, Corey

6
  • I assume you intend this to only be used in development, correct? According to the latest bitnami documentation the Windows installer should already start Solr as a service, however that may not be relevant to an older version of the installer.
    – Laver
    Commented Oct 12, 2016 at 16:46
  • Why only in development? Also, I didn't use the bitnami installer. I just copied everything manually as shown in the link I included. Commented Oct 12, 2016 at 16:47
  • Terribly sorry, I skimmed the article and thought it was recommending installing using Bitnami.
    – Laver
    Commented Oct 12, 2016 at 16:50
  • The reason I asked about development is I'd read that the default Jetty setup shouldn't be used for production workloads, however after a bit of searching I found this which seems to indicate it'll work just fine. Be aware that these are running it in Linux, not Windows, so you mileage may vary.
    – Laver
    Commented Oct 12, 2016 at 17:01
  • 1
    On Stack Exchange sites, it is customary to mark the answer that helped you the most as accepted. Please consider doing that for one of the answers presented. Commented Oct 17, 2016 at 18:38

12 Answers 12

49

One option is to use NSSM - the Non-Sucking Service Manager.

It basically has the ability to install any .exe as a service in Windows.

Download it and put it anywhere in your system PATH. Then open up a command prompt, navigate to your SOLR-5.0.0 (as appropriate) directory and issue this command:

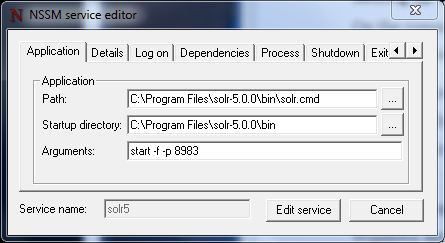
nssm install solr5

This prompts you to configure your service and get things going.

enter image description here

Reference: How to Run Solr5 as a Service on Windows

7
  • Thanks. Do you know if this will work for Solr 4.10 as well? Commented Oct 12, 2016 at 16:51
  • 3
    I want to add a huge caution flag here: In Windows 10, a September 27th windows update (I don't know which one) that I received went through and removed all of the windows services that were created with NSSM. I had to go back through and recreate them with NSSM. Haven't had a problem since, but wanted to make sure this got raised up. Commented Oct 12, 2016 at 18:06
  • 2
    @PeteNavarra This also happened with my Bitnami Solr Stack instances. Was extremely annoying, I actually had to rename the services because they refused to reinstall. Commented Oct 12, 2016 at 19:28
  • 1
    I can vouch for NSSM usage now for solr 4.10.4 and 6.6.1. Commented Oct 23, 2017 at 14:37
  • 2
    the -r here is essential. Service creates without it, but stopping the service doesn't stop the running instance without the -r, which makes "restarting" the service fail.
    – Nona Drake
    Commented Aug 8, 2019 at 13:03
11

You might consider using the Bitnami Solr Stack. It's basically an "opinionated" stack if you will, and will help ensure that you retain the same structure and setup regardless of whether you're local or in the cloud. I've not extensively used this on production instances or "at scale", but it's a quick way to get Solr up and running on Windows locally.

Here's some Sitecore Community documentation for reference.

7

Corey if you are using Apache Tomcat then you can just set windows to start the service up automatically when the server/machine starts and it should spin up Solr and all work fine.

enter image description here

-- Update --

With regard to running two instances on the same machine I've done this before so it's definitely possible. I think you need to install Apache again with a named instance like so:

C:\> service.bat install SolrTomcat2

Then in the solr.xml file change the port number:

hostPort="9090"

Then start the 2nd Tomcat service and run it should spin up a 2nd solr instance on http://localhost:9090.

11
  • Yes. Actually I want to have 2 different instance of Solr running on my machine. I already have one running automatically through Apache Tomcat as you mention. I would like to add a second instance of Solr running on a different port. But I can't figure out how to do that. Commented Oct 12, 2016 at 16:59
  • Ok see my updated answer above Commented Oct 12, 2016 at 17:07
  • Ok. Forgive my ignorance. I was able to find the service.bat file in my current Apache Tomcat installation. So I ran that like you said and it did create a second service running on my machine. Then you say to change the port number in the solr.xml file. Where do I find that file? If I change that in my current solr.xml file won't it change the port that the first instance of Tomcat is using? Commented Oct 12, 2016 at 17:21
  • Corey - It's ok. I have a fair bit of experience in setting up Solr as done it many times. It's kinda confusing. So you need to take a copy of the whole Solr folder you downloaded and place it somewhere else so you have two Solr folders. e.g: C:\Solr1 and c:\Solr2. You can then safely change the config in each of your Solr Folders. Then in each of your Tomcat instances (under the java tab --> java options - on the Tomcat monitor app ) set the path to point to the right Solr folder. e.g: -Dsolr.solr.home=C:\Solr1. Then you should have two separate tomcat instances pointing to 2 different Solrs. Commented Oct 12, 2016 at 17:34
  • Ok. That makes sense. I think the part I am missing is exactly how to install Apache Tomcat a second time. Do I have to run the EXE installer a second time? Or do I just have to run the service.bat file from the first instance? From reading your first comment it sounded like I didn't have to run the full blown EXE installer a second time. But now I'm thinking I do have to run it. Commented Oct 12, 2016 at 17:42
7

I have Solr as Service running using Bitnami you can download there here https://downloads.bitnami.com/files/solr/bitnami-solr-4.10.3-0-windows-installer.exe

Once installed look in this directory C:\Bitnami\solr-4.10.3-0\apache-solr\scripts (depends on your install location) you will find a file called serviceinstall.bat, you can use this batch file to install the Solr Service for Windows.

I have customized this file to to change my JavaHome to use a 64 bit version of Java so I can increase the Xmx and Xms values to allocate more memory to the Jvm.

My File is here

@echo off
rem -- Check if argument is INSTALL or REMOVE

if not ""%1"" == ""INSTALL"" goto remove

"C:\Bitnami\solr-4.10.3-0/apache-solr\scripts\prunsrv.exe" //IS//solr --DisplayName="solr" --Install="C:\Bitnami\solr-4.10.3-0/apache-solr\scripts\prunsrv.exe" --LogPath="C:\Bitnami\solr-4.10.3-0/apache-solr\logs" --LogLevel=Debug --StdOutput=auto --StdError=auto --StartMode=Java --StopMode=Java --Jvm=auto ++JvmOptions=-DSTOP.PORT=8079 ++JvmOptions=-DSTOP.KEY=s3crEt ++JvmOptions=-Djetty.home="C:\Bitnami\solr-4.10.3-0/apache-solr" ++JvmOptions=-Dsolr.solr.home="C:\Bitnami\solr-4.10.3-0/apache-solr/solr" --Jvm=auto ++JvmOptions=-Djetty.logs="C:\Bitnami\solr-4.10.3-0/apache-solr\logs" --JavaHome="C:\Program Files\Java\jre1.8.0_91" ++JvmOptions=-XX:MaxPermSize=256M ++JvmOptions=-Xms5120M ++JvmOptions=-Xmx5120M --Classpath="C:\Bitnami\solr-4.10.3-0/apache-solr\lib\*";"C:\Bitnami\solr-4.10.3-0/apache-solr\start.jar" --StartClass=org.eclipse.jetty.start.Main ++StartParams="C:\Bitnami\solr-4.10.3-0/apache-solr\etc\jetty.xml" --StopClass=org.eclipse.jetty.start.Main ++StopParams=--stop ++StopParams=-DSTOP.PORT=8079 ++StopParams=-DSTOP.KEY=s3crEt --Startup=auto

net start solr >NUL
goto end

:remove
rem -- STOP SERVICE BEFORE REMOVING

net stop solr >NUL
sc delete solr


:end

Once you are happy with the contents of the serviceinstall.bat file, open cmd prompt and navigate to the directory C:\Bitnami\solr-4.10.3-0\apache-solr\scripts (for my install) and run serviceinstall.bat INSTALL this will install a new windows service for Solr named Solr.

Solr Windows Service

You can then go to your Windows Services and start the newly installed service.

7

I just wanted to add another answer, as Sitecore 9 requires SOLR (or Azure) now and that is be secure. Jeremy Davis wrote a good post on a script that installs SOLR, configures it for HTTPS, makes it a windows server and starts it with NSSM.

The post: https://jermdavis.wordpress.com/2017/10/30/low-effort-solr-installs/

The script: https://gist.github.com/jermdavis/8d8a79f680505f1074153f02f70b9105

the script

In case the post goes away. Here is the script.

Param(
    $solrVersion = "6.6.2",
    $installFolder = "c:\solr",
    $solrPort = "8983",
    $solrHost = "solr",
    $solrSSL = $true,
    $nssmVersion = "2.24",
    $JREVersion = "1.8.0_151"
)

$JREPath = "C:\Program Files\Java\jre$JREVersion"
$solrName = "solr-$solrVersion"
$solrRoot = "$installFolder\$solrName"
$nssmRoot = "$installFolder\nssm-$nssmVersion"
$solrPackage = "https://archive.apache.org/dist/lucene/solr/$solrVersion/$solrName.zip"
$nssmPackage = "https://nssm.cc/release/nssm-$nssmVersion.zip"
$downloadFolder = "~\Downloads"

## Verify elevated
## https://superuser.com/questions/749243/detect-if-powershell-is-running-as-administrator
$elevated = [bool](([System.Security.Principal.WindowsIdentity]::GetCurrent()).groups -match "S-1-5-32-544")
if($elevated -eq $false)
{
    throw "In order to install services, please run this script elevated."
}

function downloadAndUnzipIfRequired
{
    Param(
        [string]$toolName,
        [string]$toolFolder,
        [string]$toolZip,
        [string]$toolSourceFile,
        [string]$installRoot
    )

    if(!(Test-Path -Path $toolFolder))
    {
        if(!(Test-Path -Path $toolZip))
        {
            Write-Host "Downloading $toolName..."
            Start-BitsTransfer -Source $toolSourceFile -Destination $toolZip
        }

        Write-Host "Extracting $toolName to $toolFolder..."
        Expand-Archive $toolZip -DestinationPath $installRoot
    }
}
# download & extract the solr archive to the right folder
$solrZip = "$downloadFolder\$solrName.zip"
downloadAndUnzipIfRequired "Solr" $solrRoot $solrZip $solrPackage $installFolder

# download & extract the nssm archive to the right folder
$nssmZip = "$downloadFolder\nssm-$nssmVersion.zip"
downloadAndUnzipIfRequired "NSSM" $nssmRoot $nssmZip $nssmPackage $installFolder

# Ensure Java environment variable
$jreVal = [Environment]::GetEnvironmentVariable("JAVA_HOME", [EnvironmentVariableTarget]::Machine)
if($jreVal -ne $JREPath)
{
    Write-Host "Setting JAVA_HOME environment variable"
    [Environment]::SetEnvironmentVariable("JAVA_HOME", $JREPath, [EnvironmentVariableTarget]::Machine)
}

# if we're using HTTP
if($solrSSL -eq $false)
{
    # Update solr cfg to use right host name
    if(!(Test-Path -Path "$solrRoot\bin\solr.in.cmd.old"))
    {
        Write-Host "Rewriting solr config"

        $cfg = Get-Content "$solrRoot\bin\solr.in.cmd"
        Rename-Item "$solrRoot\bin\solr.in.cmd" "$solrRoot\bin\solr.in.cmd.old"
        $newCfg = $newCfg | % { $_ -replace "REM set SOLR_HOST=192.168.1.1", "set SOLR_HOST=$solrHost" }
        $newCfg | Set-Content "$solrRoot\bin\solr.in.cmd"
    }
}

# Ensure the solr host name is in your hosts file
if($solrHost -ne "localhost")
{
    $hostFileName = "c:\\windows\system32\drivers\etc\hosts"
    $hostFile = [System.Io.File]::ReadAllText($hostFileName)
    if(!($hostFile -like "*$solrHost*"))
    {
        Write-Host "Updating host file"
        "`r`n127.0.0.1`t$solrHost" | Add-Content $hostFileName
    }
}

# if we're using HTTPS
if($solrSSL -eq $true)
{
    # Generate SSL cert
    $existingCert = Get-ChildItem Cert:\LocalMachine\Root | where FriendlyName -eq "$solrName"
    if(!($existingCert))
    {
        Write-Host "Creating & trusting an new SSL Cert for $solrHost"

        # Generate a cert
        # https://docs.microsoft.com/en-us/powershell/module/pkiclient/new-selfsignedcertificate?view=win10-ps
        $cert = New-SelfSignedCertificate -FriendlyName "$solrName" -DnsName "$solrHost" -CertStoreLocation "cert:\LocalMachine" -NotAfter (Get-Date).AddYears(10)

        # Trust the cert
        # https://stackoverflow.com/questions/8815145/how-to-trust-a-certificate-in-windows-powershell
        $store = New-Object System.Security.Cryptography.X509Certificates.X509Store "Root","LocalMachine"
        $store.Open("ReadWrite")
        $store.Add($cert)
        $store.Close()

        # remove the untrusted copy of the cert
        $cert | Remove-Item
    }

    # export the cert to pfx using solr's default password
    if(!(Test-Path -Path "$solrRoot\server\etc\solr-ssl.keystore.pfx"))
    {
        Write-Host "Exporting cert for Solr to use"

        $cert = Get-ChildItem Cert:\LocalMachine\Root | where FriendlyName -eq "$solrName"

        $certStore = "$solrRoot\server\etc\solr-ssl.keystore.pfx"
        $certPwd = ConvertTo-SecureString -String "secret" -Force -AsPlainText
        $cert | Export-PfxCertificate -FilePath $certStore -Password $certpwd | Out-Null
    }

    # Update solr cfg to use keystore & right host name
    if(!(Test-Path -Path "$solrRoot\bin\solr.in.cmd.old"))
    {
        Write-Host "Rewriting solr config"

        $cfg = Get-Content "$solrRoot\bin\solr.in.cmd"
        Rename-Item "$solrRoot\bin\solr.in.cmd" "$solrRoot\bin\solr.in.cmd.old"
        $newCfg = $cfg | % { $_ -replace "REM set SOLR_SSL_KEY_STORE=etc/solr-ssl.keystore.jks", "set SOLR_SSL_KEY_STORE=$certStore" }
        $newCfg = $newCfg | % { $_ -replace "REM set SOLR_SSL_KEY_STORE_PASSWORD=secret", "set SOLR_SSL_KEY_STORE_PASSWORD=secret" }
        $newCfg = $newCfg | % { $_ -replace "REM set SOLR_SSL_TRUST_STORE=etc/solr-ssl.keystore.jks", "set SOLR_SSL_TRUST_STORE=$certStore" }
        $newCfg = $newCfg | % { $_ -replace "REM set SOLR_SSL_TRUST_STORE_PASSWORD=secret", "set SOLR_SSL_TRUST_STORE_PASSWORD=secret" }
        $newCfg = $newCfg | % { $_ -replace "REM set SOLR_HOST=192.168.1.1", "set SOLR_HOST=$solrHost" }
        $newCfg | Set-Content "$solrRoot\bin\solr.in.cmd"
    }
}

# install the service & runs
$svc = Get-Service "$solrName" -ErrorAction SilentlyContinue
if(!($svc))
{
    Write-Host "Installing Solr service"
    &"$installFolder\nssm-$nssmVersion\win64\nssm.exe" install "$solrName" "$solrRoot\bin\solr.cmd" "-f" "-p $solrPort"
    $svc = Get-Service "$solrName" -ErrorAction SilentlyContinue
}
if($svc.Status -ne "Running")
{
    Write-Host "Starting Solr service"
    Start-Service "$solrName"
}

# finally prove it's all working
$protocol = "http"
if($solrSSL -eq $true)
{
    $protocol = "https"
}
Invoke-Expression "start $($protocol)://$($solrHost):$solrPort/solr/#/"
1
  • Definitely the best answer in this thread! Commented Oct 14, 2018 at 6:02
4

I was always annoyed by the need to use external applications to run Solr as a Windows service. Some time ago I found a PowerShell script that allows you to write services for Windows in PowerShell. I decided to adopt it to run Solr as a Windows service. I cleaned up the code with all the unnecessary functions.

The full script is available on my gist : https://gist.github.com/RobsonAutomator/6a74c6dfceb6bdcde9c27be9f2d36256

Configuration Configuration is a place where we can specify the port on which Solr will work and the amount of memory used by Java. The SOLR_HOME variable is used to locate the location where Solr is installed. If it is not set, the script will exit displaying the message: Solr.cmd not exist:

#region Solr configuration
$solrPort = '8983' 
$solrMemory = '512m' # eg. 1g 4g
$solrHome = [environment]::GetEnvironmentVariable("SOLR_HOME",[EnvironmentVariableTarget]::Machine)  
$solrRoot =  Split-Path -Path (Split-Path -Path $solrHome -Parent) -Parent
$sorlStartCmd = Join-Path -Path $solrRoot -ChildPath "bin\solr.cmd"

if( -not (Test-Path -Path $sorlStartCmd) )
{
    Write-Warning "Solr.cmd not exist: $sorlStartCmd"
    return
}
#endregion

Start In the region 'Solr Start' there is a code to run Solr:

#region Solr start
Log "$scriptName Starting $sorlStartCmd with parameteres start -f -p $solrPort -m $solrMemory"
&$sorlStartCmd start -f -p $solrPort -m $solrMemory
#endregion

Stop In the region "Solr Stop" there is a code to stop Solr:

#region Solr stop 
&$sorlStartCmd stop -p $solrPort
#endregion

Setup First of all You have to run script with administrator rights Use this script is extremally simple. First run script with parameter -Setup This will create PSSolrService.exe and PSSolrService.ps1 in the folder:

$installDir = "${ENV:ProgramFiles}\$serviceName"

When PSSolrService is installed then use -Start parameter to start service. Till now you can start/stop PSSolrService as each Windows service.

Blog post: http://lets-share.senktas.net/2017/11/solr-as-a-service.html

1
  • 1
    Can you add some more information in the asnwer itself? Otherwise this will be seen as a link-only answer.
    – Gatogordo
    Commented Nov 24, 2017 at 9:38
3

I had written a step by step post how to run solr as a service using NSSM. Please follow the following link for more information.

In brief, it consists of 7 steps:

  1. Install Java Runtime Environment if you do not have it.
  2. Add a system environment variable called JAVA_HOME that points to your java installation.
  3. Install the NSSM.
  4. Create and unzip your Solr Package into C:/solr
  5. Open Powershell and use NSSM to set Solr up as a service
  6. Set the NSSM Values.
  7. Open your services and start the newly created Solr {solr-version} service.

In the blog post, you will have the different links required to download the files

2

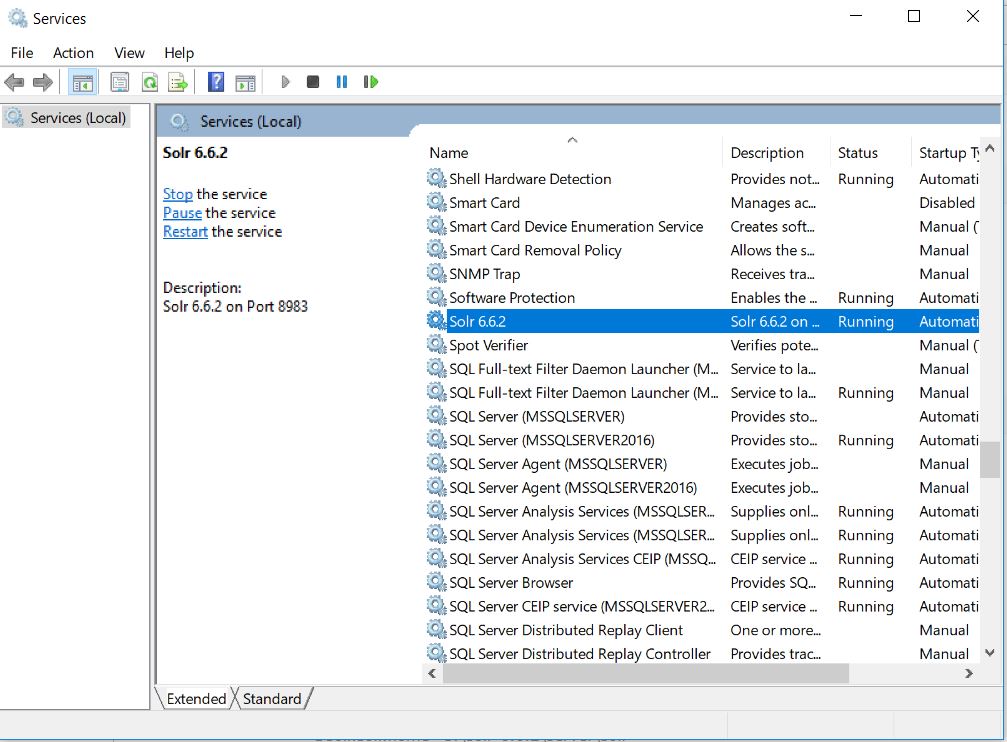
I had the same issue, resolved by starting the service Solr 6.6.2 manually. FYI, I am using windows 10.enter image description here

1

This link speaks to this topic: http://blog.outerthoughts.com/2013/07/setting-up-apache-solr-on-windows-as-a-service/ (but note there are typos in the sample script in that link!).

I use the prunmgr.exe in that link and name it SolrService.exe and then execute this at the cmd line (assuming R is your installation drive for Solr):

R:\solr-4.10.4\sitecore\SolrService.exe //IS//SolrService --DisplayName="Solr Service" --Install=R:\solr-4.10.4\sitecore\SolrService.exe --LogPath=R:\solr-4.10.4\sitecore\logs --LogLevel=Debug --StdOutput=auto --StdError=auto --StartMode=java --StopMode=java --Jvm=auto ++JvmOptions=-Djetty.home=R:\solr-4.10.4\sitecore ++JvmOptions=-DSTOP.PORT=8087 ++JvmOptions=-DSTOP.KEY=stopsolr ++JvmOptions=-Djetty.logs=R:\solr-4.10.4\sitecore\logs ++JvmOptions=-Dorg.eclipse.jetty.util.log.SOURCE=true ++JvmOptions=-XX:MaxPermSize=128M --Classpath=R:\solr-4.10.4\sitecore\start.jar --StartClass=org.eclipse.jetty.start.Main ++StartParams=OPTION=ALL ++StartParams=R:\solr-4.10.4\sitecore\etc\jetty.xml --StopClass=org.eclipse.jetty.start.Main ++StopParams=--stop ++JvmOptions=-Dsolr.solr.home=R:\solr-4.10.4\sitecore\solr --StartPath=R:\solr-4.10.4\sitecore
0

I have installed an instance or two using Docker. Unfortunately, it seems it doesn't have the exact versions we need for Sitecore compatibility at the moment - 4.10.4 and 6.6.1. Hopefully, they will get added, as Docker seems like it could potentially be a much easier way to host Solr as a container.

Official Solr containers here: hub.docker.com/_/solr

They are Linux containers though and don't have many of the versions that are recommended for compatibility. You will definitely want to make sure you are using the compatible/supportable version of Solr for your version of Sitecore. See this KB article for the compatibility table: https://kb.sitecore.net/articles/227897

Can't wait until, hopefully someday, Sitecore is .NET Core based and can run in a Linux container.

You may be interested in this question on How to run MongoDb and Solr via Docker: How do I run MongoDB and SOLR Docker images that work with Windows Server 2016?

0

Another option we ended up using was to write our own Windows service to run the standalone Solr installation. That way you have full control of the service and parameters via a config file, so you can change things more on-the-fly rather than manipulating the registry to change service parameters, like you might for NSSM.

0

If you already have an existing instance of Solr installed. Here's how you'd create the service using PowerShell:

$serviceName = "Solr"
$binaryPath = "Z:\Solr\solr-7.2.1\bin\solr.cmd -f -p 8984"
 
New-Service -name $serviceName -binaryPathName $binaryPath -displayName $serviceName -startupType Automatic
 

Source

Your Answer

By clicking “Post Your Answer”, you agree to our terms of service and acknowledge you have read our privacy policy.

Not the answer you're looking for? Browse other questions tagged or ask your own question.