4

I would like to add an option to change class on an image that is inserted into the RTE of the content item. In particularly I would like to add bootstrap class "img-responsive".

So what i have done:
Added bootstrap.css to the directory
Changed Sitecore.config to point to the bootstrap.css

<setting name="WebStylesheet" value="/sitecore/shell/Controls/Rich Text Editor/bootstrap.css" />


Edited Website\sitecore\shell\Controls\Rich Text Editor\ToolsFile.xml

<classes>
    <class name="Bootstrap Img Responsive" value=".img-responsive"/>    
</classes>

Nothing shows up in the RTE. What have I missed?

4 Answers 4

5

Pointing to the entire bootstrap.css is a bit overkill. (And I suspect Sitecore / Telerik is having a hard time parsing it.) What you should do is ignore the ToolsFile.xml entirely (make sure the <classes> element is empty), and point the WebStylesheet setting to a custom CSS file that only includes classes that should be exposed for selection.

Since you will be including bootstrap.css in your layout, you can leave the class selectors empty in your custom editor CSS:

a.blue-button {}

a.red-button {}

img.img-responsive {}

You could also add your editor-specific styling in there, or you could use the technique described in this blog post to add other CSS files to the editor.

An important point here is that the RTE in Sitecore hasn't been getting much love. One issue you'll likely run into is that if you right-click your image and select "Properties", the CSS class list in the dialog will be empty. I've never been able to find a workaround for that. Other elements like tables and links work as expected. Let us know if you figure out a fix. Meanwhile, the "Apply CSS Class" dropdown which is part of the toolbar at least works as expected.
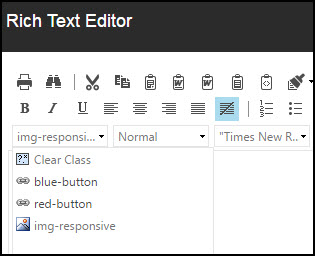
CSS Class Toolbar

Finally, you can still set your classes in ToolsFile.xml, which will allow you to present user-friendly names instead of direct CSS class names. But then, you will need to keep both CSS and XML in sync.

2

Another option you might have, is if you want to add class="img-responsive" to all images added via the RichText Editor, you can do this programmatically by patching the saveRichTextContent pipeline. Also by going this approach, you can automatically clear out any height/widths that could cause images from being responsive as well. Example of what I did is below:

<?xml version="1.0"?>
<configuration xmlns:patch="http://www.sitecore.net/xmlconfig/">
    <sitecore>
        <pipelines>
            <saveRichTextContent>
                <processor type="Site.Components.Pipelines.FormatImagesRichText, Site.Components"></processor>
            </saveRichTextContent>
        </pipelines>
    </sitecore>
</configuration>

This will just append an additional pipeline onto the SaveRichTextContent Processor. Then use the code below with the HTML Agility Pack to add/remove the html you need on the images added via the rich text editor.

namespace Site.Components.Pipelines
{
    public class FormatImagesRichText
    {
        public void Process(SaveRichTextContentArgs args)
        {
            args.Content = FormatImages(args.Content);
        }

        private string FormatImages(string content)
        {
            var doc = new HtmlDocument();
            doc.LoadHtml(content);

            if (doc == null || !doc.DocumentNode.InnerHtml.Contains("img"))
                return content;

            foreach (var img in doc.DocumentNode.Descendants("img"))
            {
                // Remove Image Width/Height + Append img-responsive class
                HtmlNode imgNode = img;

                imgNode = RemoveAttribute(imgNode, "height");
                imgNode = RemoveAttribute(imgNode, "width");

                HtmlAttribute attrClass = imgNode.Attributes["class"];

                if (attrClass != null)
                {
                    if (!attrClass.Value.Contains("img-responsive"))
                    {
                        // c# 6 interpolated
                        attrClass.Value = $"{attrClass.Value} img-responsive";
                    }
                }
                else
                {
                    imgNode.Attributes.Add("class", "img-responsive");
                }

                // Remove Height & Width from Styles Tag
                HtmlAttribute attrStyle = imgNode.Attributes["style"];

                if (attrStyle != null && !string.IsNullOrEmpty(attrStyle.Value))
                {
                    string style = attrStyle.Value;

                    Regex regex = new Regex(@"(max-width|max-height|width|height)(.*?)(;)", RegexOptions.IgnoreCase);

                    style = regex.Replace(style, string.Emtpy);

                    imgNode.Attributes["style"].Value = style.Trim();
                }
            }

            return doc.DocumentNode.OuterHtml;
        }

        private HtmlNode RemoveAttribute(HtmlNode htmlNode, string attribute)
        {
            HtmlAttribute imgAttribute = htmlNode.Attributes[attribute];

            if (imgAttribute != null)
            {
                htmlNode.Attributes.Remove(imgAttribute);
            }

            return htmlNode;
        }
    }
}
1
  • 1
    This will add it to all the images, I would like it to be only on a specific images. so for example if I insert an image into the RTE, i want to select it and they apply a class from the dropdown.
    – Tony
    Commented May 3, 2017 at 16:49
1

For the RTE in Sitecore (Telerik RadEditor), it's a one or the other type of scenario. So, you can either use the "WebStyleSheet" setting in Sitecore, or you can modify the RTE's ToolsFile.xml to add your own custom classes. I have a blog post about this here. I suspect this may be your issue.

Also note that if you modify the ToolsFile.xml file, you will likely run into issues when you perform a Sitecore upgrade, because the file may get overwritten. In my experience, it is better to generate a style sheet specifically for classes needed in the RTE, use the "WebStyleSheet" Sitecore setting to load that style sheet, and not touch the RTE's ToolsFile.xml.

1
  • Your tutorial, shows exactly what I have accomplished, and what I have written in my question. Your answer is not helpful. Thanks anyways.
    – Tony
    Commented May 3, 2017 at 16:51
0

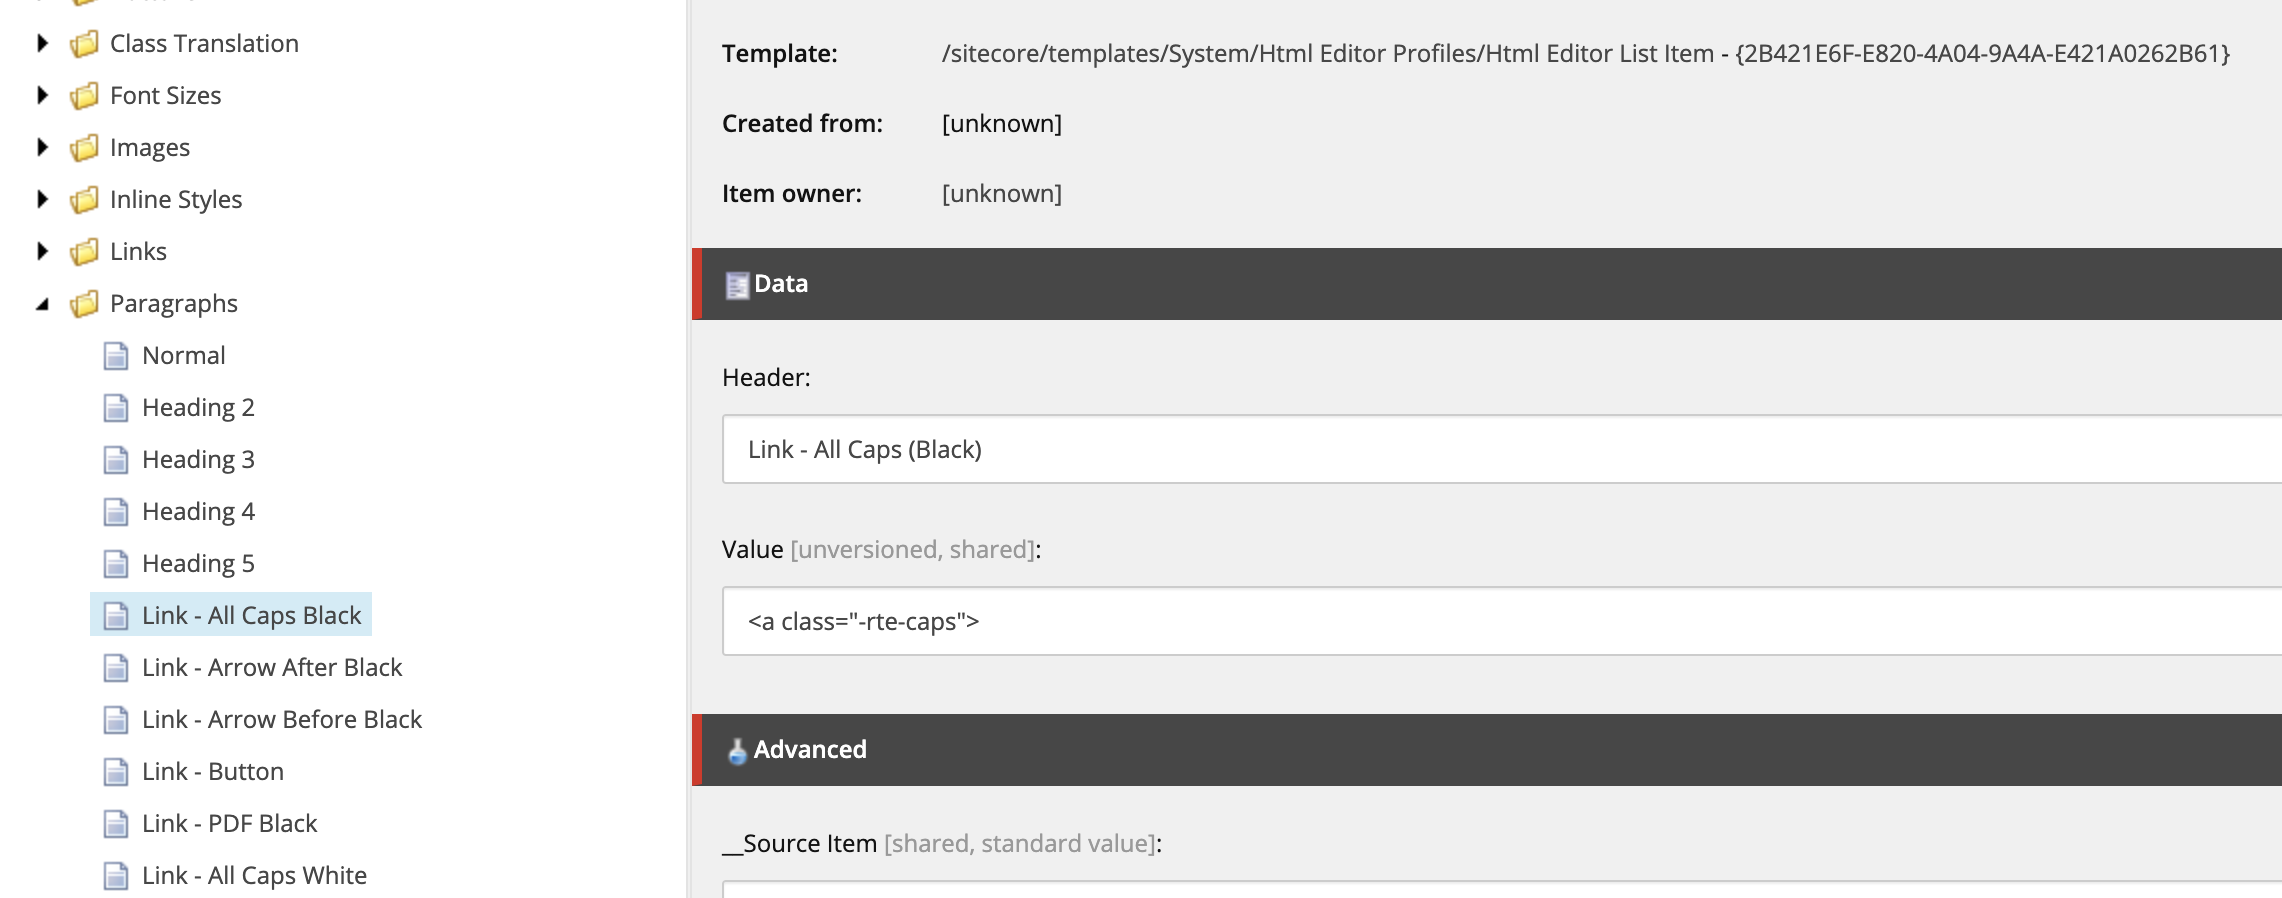
A method I much prefer for user-friendliness is to create a new paragraph type in the RTE Profile:

custom paragraph type

It looks like this in the Rich Text Editor window:

rich text editor window

This way you can choose the type of DOM element you want and can specify multiple classes.

2
  • I tried it before, if your users are not careful, they will mess up the whole site.
    – Tony
    Commented Nov 14, 2019 at 20:30
  • 1
    Any use of the rich text editor whatsoever can mess up the whole site :) Commented Nov 15, 2019 at 12:54

Your Answer

By clicking “Post Your Answer”, you agree to our terms of service and acknowledge you have read our privacy policy.

Not the answer you're looking for? Browse other questions tagged or ask your own question.